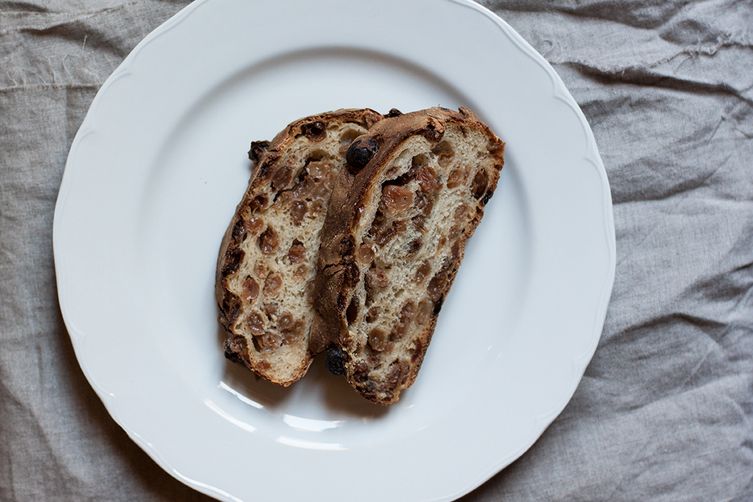
Author Notes: This raisin bread is unlike any other. In fact, it’s half flour, half raisins. I first read about this Milanese bread (sometimes called the “panettone.
Makes 1 loaf
- 1 1/2cups (250 grams) raisins
- 2teaspoons (6 grams) active dried yeast
- 1/2tablespoon sugar
- 1/2tablespoon softened butter
- 2cups (250 grams) flour (I used stone-ground, unbleached all purpose flour), plus extra for dusting
- 1/2teaspoon salt
- Place the raisins in a bowl with enough warm water to cover; let sit for 1 1/2 hours. Drain raisins thoroughly, reserving the liquid.
- Warm about 3/4 cups of the liquid until tepid (stick a finger in it, it shouldn’t feel cool or warm), pour into a bowl and stir the yeast and sugar into it. Let stand in a warmish spot in the kitchen for about 10 minutes or until the mixture begins to look creamy (even foamy if it’s warm enough). Add the softened butter and about half of the flour. Stir to combine, then add the rest of the flour and the salt. Mix the dough by hand until soft, silky and elastic, a few minutes (note, depending on the dough you may find that it is quite sticky, dusting with flour can help you mix the dough at this stage but don’t worry too much about the stickiness at this point, mix with a spoon if you prefer not to get hands sticky). You can also do this with a machine, but it’s so easy and comes together so quickly I find doing it by hand to be the simplest and most satisfying.
- Place the dough in a large, olive oil-greased bowl covered with plastic wrap or a tea towel and let rise at room temperature until doubled in size, 1-2 hours, depending on how warm your kitchen environment is. In the meantime, pat the raisins dry and dust with a couple of tablespoons of flour.
- The dough should now be soft and puffed (and if previously sticky, now less so, though still expect a bit of tackiness in areas where not dusted with flour). Place the dough on a floured surface, flatten it gently and shape into a rectangular shape. Sprinkle about a third of the raisins over the dough and roll it up, tucking in the sides—it’s best to roll it along the length so you have a long roll as you want to end up with a long loaf. Dust the surface again with flour, flatten the dough again and sprinkle over another third of the raisins. Roll up, tucking in the sides so raisins don’t fall out. If it becomes too tight to work with, Carol Field suggests letting the dough rest for about 10-15 minutes (under a tea towel so it doesn’t dry out), before adding the final third of the raisins. If your dough is very soft and still manageable, you won’t need to wait.
- To form the dough, with the last addition of raisins, roll up the dough into a long, plump loaf, tucking the ends in well underneath the loaf. Lift the loaf onto a baking sheet lined with parchment paper. Cover with a tea towel and let rise an hour.
- When ready to bake, heat oven to 450ºF (230ºC). Place the bread on a bottom shelf and after 5 minutes, turn the heat down to 400ºF (200ºC) and continue baking 30-40 minutes longer or until a dark brown crust forms. Cool completely on a rack. This is easier to cut when it is a day or more old. Stored wrapped in parchment paper, or in plastic, it keeps very, very well, at least a week but I’ve never been able to resist keeping a slice of this bread uneaten longer than that.
Share this content:


Post Comment